Building a Dynamic Image Preview with HTML, CSS, and JavaScript
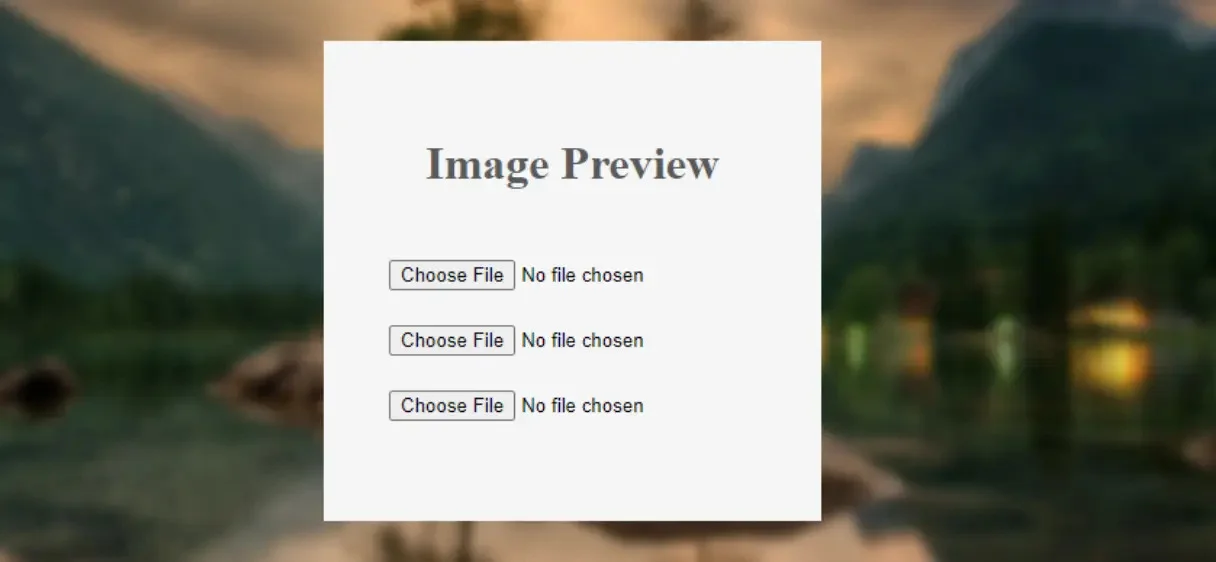
We will be creating a simple image upload form that users can use to select multiple images from their device. The selected image preview in JavaScript will be dynamically previewed before submitting, thus creating an excellent user experience as people are sure they are uploading the correct images.
In this guide, we will cover:
- How to structure the HTML for multiple image inputs.
- How to style the preview boxes using CSS.
- Implementing the dynamic preview functionality using JavaScript.
By the end of this post, you will have a better understanding of how to create a beautiful and functional image preview feature for any web project.
Step 1: HTML structure for Image preview in JavaScript
We start by creating a basic image preview in a JavaScript structure using HTML. We will include a form with several input fields for selecting images. Each input will be wrapped inside a container, and we’ll leave room for a preview of each image.
					<div class="first-div">
    <h1 style="text-align: center;color:#5a5a5a;margin-bottom: 48px;">Image Preview</h1>
    <div class="file-input-container">
        <input type="file" class="fileInput" accept="image/*">
        <div class="image-preview imagePreview"></div>
    </div>
    <br>
    <div class="file-input-container">
        <input type="file" class="fileInput" accept="image/*">
        <div class="image-preview imagePreview"></div>
    </div>
    <br>
    <div class="file-input-container">
        <input type="file" class="fileInput" accept="image/*">
        <div class="image-preview imagePreview"></div>
    </div>
</div>
Step 2: CSS for Image preview in JavaScript
Next, we’ll style the image input field and preview box. The goal is to create a visually appealing design that also enhances user interaction.
					body::before {
    content: "";
    position: fixed;
    top: 0;
    left: 0;
    width: 100%;
    height: 100%;
    background: url("images/nature-3082832_1280.jpg");
    background-size: cover;
    background-position: center;
    filter: blur(4px);
    z-index: -1;
}
.first-div {
    position: absolute;
    top: 25%;
    left: 38%;
    background-color: whitesmoke;
    padding: 45px;
}
input[type="file"] {
    width: 100%;
    height: 45px;
}
.file-input-container {
    position: relative;
    display: inline-block;
}
.image-preview {
    display: none;
    position: absolute;
    top: 100%;
    left: 0;
    width: 200px;
    height: auto;
    border: 1px solid #ccc;
    background-color: #fff;
    z-index: 10;
}
.file-input-container:hover .image-preview {
    display: block;
}
Explanation:
- The
body::beforepseudo-element is used to add a blurred background image, creating a modern look. - The
.first-divis the main container for our inputs, with absolute positioning for centering and a clean design. - The
.image-previewclass initially hides the preview box. It becomes visible when the user hovers over the file input container.
Step 3: Implementing Javascript for Image Preview
Now comes the most important part: dynamically displaying the image preview. We will use JavaScript to handle image selection and rendering in the preview box.
					document.querySelectorAll('.fileInput').forEach((input, index) => {
    input.addEventListener('change', function(event) {
        const file = event.target.files[0];
        if (file) {
            const reader = new FileReader();
            reader.onload = function(e) {
                const imagePreview = document.querySelectorAll('.imagePreview')[index];
                imagePreview.style.backgroundImage = `url(${e.target.result})`;
                imagePreview.style.backgroundSize = 'cover';
                imagePreview.style.backgroundPosition = 'center';
                imagePreview.style.width = '200px';
                imagePreview.style.height = '200px';
            };
            reader.readAsDataURL(file);
        }
    });
});
Explanation:
- We use
document.querySelectorAllto target all the file inputs on the page. - For each input, we listen to the
changeevent, which triggers when a file is selected. - The
FileReaderobject reads the image file and converts it into a data URL that can be used as thebackground-imagefor the preview box. - The preview is styled to fit within the specified dimensions and centered within the container.
Conclusion
Using dynamic image previews in JavaScript for your web application can significantly improve the user experience. By offering instant feedback and easy integration, it enables users to select the appropriate images. With the aid of HTML, CSS and JavaScript, we have assembled a useful element that is user-friendly for many web applications.
The design and behavior can be adjusted without any constraints. This setup is a great starting point for any image upload feature, whether it’s for adding more styling, improving responsiveness, or enabling multiple file previews.
Download Source Code
Send download link to: