Create responsive dashboard in html, css and javascript
Creating a responsive dashboard with Bootstrap 4 can make a tremendous difference in how users interact with the data on your website. In this guide, we’ll dive into creating a simple, interactive dashboard layout using HTML, CSS, and JavaScript with Bootstrap 4. By the end, you will have a strong foundation for building more dynamic and functional web applications. Let’s start by understanding the main components of this dashboard and the benefits of each.
Why use Bootstrap 4 for Dashboard?
Bootstrap 4 is one of the most popular CSS frameworks for responsive web development. With its predefined grid system, reusable components, and responsive design, Bootstrap simplifies the creation of complex layouts, including dashboards. Here are some benefits:
- Responsive by Default: Automatically adjusts the layout for various screen sizes.
- Predefined Components: Contains components like navigation bars, buttons, and forms that enhance functionality.
- Customizable: Easily integrates with custom CSS to tailor the look of your dashboard.
Structure of the Dashboard Layout
Our HTML structure is divided into two main parts:
- Sidebar: Acts as a navigation menu with links for different dashboard sections.
- Main Content Area: Contains the header, navigation bar, and the main interactive components, including forms and text areas.
Here’s a breakdown of each section.
Creating the Sidebar
The sidebar provides a fixed menu on the left side of the dashboard. In our example, we use a dark background to make it stand out from the main content area. We also add navigation links for different sections like Users, Reports and Settings. Here is the sidebar code snippet:
					<div class="bg-dark border-right" id="sidebar-wrapper">
    <div class="sidebar-heading text-white">Dashboard</div>
    <div class="list-group list-group-flush">
        <a href="#" class="list-group-item list-group-item-action bg-dark text-white">Dashboard</a>
        <a href="#" class="list-group-item list-group-item-action bg-dark text-white">Users</a>
        <a href="#" class="list-group-item list-group-item-action bg-dark text-white">Reports</a>
        <a href="#" class="list-group-item list-group-item-action bg-dark text-white">Settings</a>
    </div>
</div>
Main Content Area
					<div id="page-content-wrapper">
    <!-- Navbar -->
    <nav class="navbar navbar-expand-lg navbar-light bg-light border-bottom">
        <button class="btn btn-primary" id="menu-toggle"><i class="fa fa-bars"></i></button>
        <div class="navbar-brand ml-3">Dashboard</div>
        <button class="navbar-toggler" type="button" data-toggle="collapse" data-target="#navbarSupportedContent"
                aria-controls="navbarSupportedContent" aria-expanded="false" aria-label="Toggle navigation">
            <span class="navbar-toggler-icon"></span>
        </button>
        <div class="collapse navbar-collapse" id="navbarSupportedContent">
            <ul class="navbar-nav ml-auto mt-2 mt-lg-0">
                <li class="nav-item active">
                    <a class="nav-link" href="#">Home</a>
                </li>
                <li class="nav-item">
                    <a class="nav-link" href="#">Profile</a>
                </li>
                <li class="nav-item">
                    <a class="nav-link" href="#">Settings</a>
                </li>
            </ul>
        </div>
    </nav>
</div>
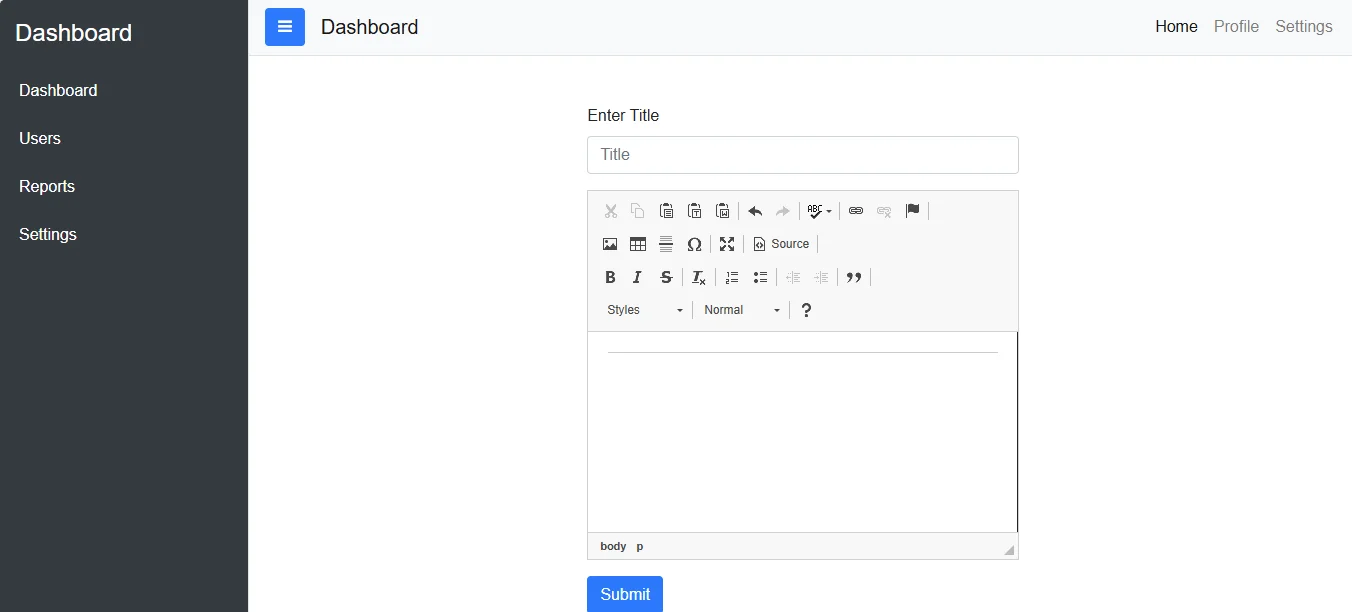
Form Section
In the form area, users can submit data along with title input and a message box. We’ve also integrated CKEditor for a rich text editing experience, making it ideal for inputting detailed content.
					<div class="container pt-5">
    <div class="row justify-content-center">
        <div class="col-lg-5">
            <form action="<?php $_SERVER["PHP_SELF"]?>" method="POST" onsubmit="return(Myfunction())">
                <div class="form-group">
                    <label>Enter Title</label>
                    <input type="text" name="title" class="form-control" placeholder="Title">
                </div>
                <div class="form-group">
                    <textarea name="message" id="newsletter" rows="10" cols="40" class="form-control" required placeholder="Write Message here"></textarea>
                </div>
                <input type="submit" name="submit" class="btn btn-primary" value="Submit">
            </form>
        </div>
    </div>
</div>
- CKEditor: Provides users with a WYSIWYG (What You See Is What You Get) editor, giving them formatting options.
- onsubmit=”return(Myfunction())”: Calls a JavaScript function to validate inputs before submission.
Adding Interactivity with JavaScript
To validate input, we use a JavaScript function that checks if all required fields are filled. Here’s the script:
					function Myfunction() {
    var emailInput = document.getElementById("emailInput").value;
    var newsletter = document.getElementById("newsletter").value;
    if (emailInput === "") {
        alert("Please Fill Email");
        return false;
    } else if (newsletter === "") {
        alert("Please Fill Subject");
        return false;
    } else {
        return true;
    }
}
Loading Necessary Libraries
To implement Bootstrap and Font Awesome icons, we link external libraries in the <head> section, increasing functionality and design flexibility.
To make sure interactive elements work as expected, we also add jQuery, Popper.js, and Bootstrap JavaScript files.
Conclusion
Creating a dashboard with Bootstrap 4 can significantly improve the user experience on your website. With a responsive design, a clearly separated sidebar, interactive elements, and easy integration with tools like CKEditor, you can provide users with a robust interface to manage their data. This dashboard setup is just the beginning – explore more Bootstrap features and add-ons to further enhance the layout, functionality, and visual appeal of your dashboard.
Dashboard Source Code Download
Send download link to:

I every time emailed this website post page to
all my contacts, because if like to read it afterward my links
will too.
yes what happened