This tutorial covers the entire process of constructing a sign-up form with PHP as the backend, Bootstrap styling, and JavaScript for front-end validation. All the necessary documentation is included in the package.
Features of the Sign-Up Form:
- Bootstrap 4 is utilized in the form to create a clean and responsive appearance.
- To guarantee secure submission and ensure proper data validation, clients and servers must pass client-side JavaScript or PHP code.
- Validation: After verifying, name, e-mail, password are stored in a MySQL database.
- Confirmation Emails: A user is automatically emailed when they sign up.
- Prior to commencing, it is recommended to familiarize yourself with HTML, PHP, and MySQL. You’ll need a server environment that is operational and has access to. MySQL database.
Before getting started, ensure that you have a basic understanding of HTML, PHP, and MySQL. You’ll also need a working server environment with access to a MySQL database.
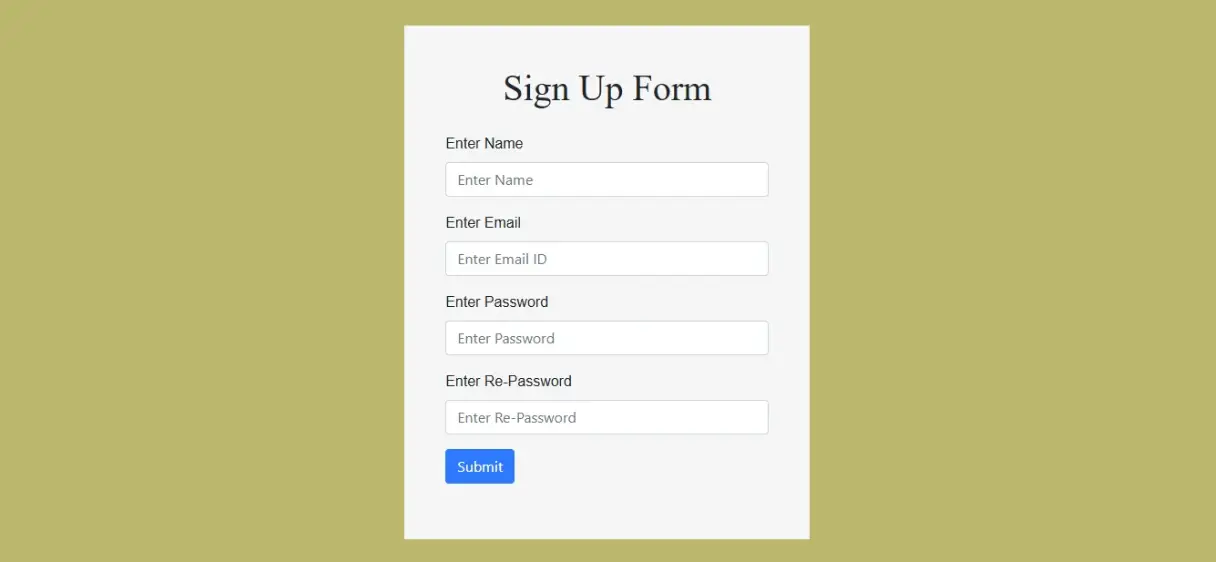
HTML Structure
We start to creating the HTML structure of the sign-up form. Bootstrap is used to ensure that the form looks professional and is responsive on different devices.
<style>
    body {
        background-color: darkkhaki;
    }
    .container {
        position: absolute;
        top: 5%;
        left: 8%;
    }
    .background {
        background-color: whitesmoke;
        padding: 45px;
    }
    h1 {
        font-family: "Times New Roman", Times, serif;
    }
    label {
        font-family: Arial, Helvetica, sans-serif;
    }
</style>
<div class="container">
    <div class="row justify-content-center">
        <div class="col-lg-5">
            <div class="background">
                <h1 class="text-center mb-4">Sign Up Form</h1>
                <form action="process_signup.php" method="POST" onsubmit="return Myfunction()">
                    <div class="form-group">
                        <label>Enter Name</label>
                        <input type="text" id="name" name="name" placeholder="Enter Name" class="form-control">
                    </div>
                    <div class="form-group">
                        <label>Enter Email</label>
                        <input type="email" id="email" name="email" placeholder="Enter Email ID" class="form-control">
                    </div>
                    <div class="form-group">
                        <label>Enter Password</label>
                        <input type="password" id="password" name="password" placeholder="Enter Password" class="form-control">
                    </div>
                    <div class="form-group">
                        <label>Re-enter Password</label>
                        <input type="password" id="password2" placeholder="Enter Re-Password" class="form-control">
                    </div>
                    <div class="form-group">
                        <input type="submit" name="submit" class="btn btn-primary">
                    </div>
                </form>
            </div>
        </div>
    </div>
</div>
Adding Validation with JavaScript
For better user experience, we validate form inputs on the client side before sending the data to the server. This will ensure that required fields are not left blank and both passwords match.
					<script type="rocketlazyloadscript">
    function Myfunction() {
        var name = document.getElementById("name").value;
        var email = document.getElementById("email").value;
        var password = document.getElementById("password").value;
        var password2 = document.getElementById("password2").value;

        if (name === "") {
            alert("Please fill the name field");
            return false;
        } else if (email === "") {
            alert("Please fill the email field");
            return false;
        } else if (password === "") {
            alert("Please fill the password field");
            return false;
        } else if (password2 === "") {
            alert("Please fill the Re-password field");
            return false;
        } else if (password !== password2) {
            alert("Passwords do not match");
            return false;
        } else {
            return true;
        }
    }
</script>
Backend Processing with PHP and MySQL
process_signup.php, that will process the form data. The script will check whether the e-mail exists in the database and, if it does not, will insert the user’s details into the sign table. Create the conn.php File for the MySQLi Connection
					<?php
    include_once 'conn.php'; // Database connection

    if(isset($_POST["submit"])) {
        $name = $_POST["name"];
        $email = $_POST["email"];
        $password = $_POST["password"];

        // Check if the email is already registered
        $sql = "SELECT * FROM sign WHERE email='$email'";
        $result = mysqli_query($conn, $sql);

        if(mysqli_fetch_assoc($result)) {
            echo "<p class='text-danger'>Email already exists!</p>";
        } else {
            // Insert new user into the database
            $sql = "INSERT INTO sign (name, email, password) VALUES ('$name', '$email', '$password')";
            if(mysqli_query($conn, $sql)) {
                // Send confirmation email
                $to = $email;
                $subject = "Welcome to Our Website!";
                $message = "Hi $name,\n\nThank you for signing up!";
                $headers = "From: no-reply@yourwebsite.com";

                if(mail($to, $subject, $message, $headers)) {
                    echo "<p class='text-success'>Confirmation email sent!</p>";
                } else {
                    echo "<p class='text-danger'>Failed to send confirmation email.</p>";
                }
            } else {
                echo "<p class='text-danger'>Error registering user.</p>";
            }
        }
    }
?>
In this file, we’ll establish the connection to the MySQL database.
					<?php
    $conn = mysqli_connect("localhost", "root", "", "signup_form");
    if (!$conn) {
        die("Connection failed: " . mysqli_connect_error());
    }
?>
In the above code:
"localhost"is the server (usually localhost when working on a local server)."root"is the MySQL username (default for local environments).""is the MySQL password (leave empty if there is no password for the root user)."signup_form"is the name of the database where you are storing the user information.
Once the code is imposed and implemented in the local or live server, check if the code runs perfectly and is working as intended. Just check if the database connection is set properly if the form data is correctly entered into the database. Check the email confirmation now to see if users receive welcome emails.
Php complete form
Send download link to: